Make your presence felt on the Web in about $8USD/Rs350INR
Do you want to have a Personal blog with a address of yourname.com and a personnel email id of you@yourname.com but you were shy because it costs too much very year. Check again now prices has fallen drastically it is possible to register a Domain for about $8USD/Rs.350INR per year.
Now, many of you would like to ask “can I make your blog & email with just a domain?”. The Answer is “No, you need other things”.but good part is almost all other things needed for a personnel email & blog solution can be brought for FREE!.
Here is the list of things we would be needing:-
1) .Com or any other ****gTLD** with Managed DNS service**: you can buy a domain from any ICANN accredited registrar but I would recommend buying from namecheap.com as you also get ability to create CNAME,MX records, which need for brought separately for all other hosts. although Namecheap.com says Price at$9.29USD but it can be reduced to $8.41 by using a Coupon code:BACK2SCHOOL(Source:Retailmenot). if you have already brought a domain from a different registrar and it didn’t give Managed DNS. you can use FreeDNS service for no extra charge.
2) Google Account: for Blogspot blogging service. Mostly Likely you would be having a Google account, if not then create one. After you created a Google account, Goto Blogger.com/start and create your own blog on Blogspot.com. choose available subdomain. if you already have a blog at Blogspot then no need to create a new one, you can transfer your existing blog to your new domain.
Note:Instructions for configuring DNS are different for every registrar. Hence,for clarity I would be using FreeDNS service. it would enable me to give specific easy to understand, step by step. Since free service which is open to everyone without paying any charge.Therefore, you are encouraged to use this service.
PART-I
Setting up DNS Records
1) Signup for FreeDNS. Complete Registration by clicking on Activation link which would be sent to email address you provided at time of registration.Now your account activation is complete and you can proceed next step.
2) Add Domain: **From the Homepage, Click on Domains. your would be asked to login to your newly created account. Now click on Add a Domain._Now you should see a screen similar to what is given below. Enter the your Domain address, Choose Share State to _Private and click on **Submit
3) **Change NameServers: **Most likely you would receive a warning that your Domain is marked BROKEN. It is because you need change your Domain NameServer configuration. Instead of using default server, you have to change to FreeDns supplied nameservers which are:
-
NS1.AFRAID.ORG
-
NS2.AFRAID.ORG
-
NS3.AFRAID.ORG
-
NS4.AFRAID.ORG
Changing Nameserver usually requires logging in to your Domain Control Panel and click on Option Named “Change Nameserver Records” or “Modify NameServer”. If you need help you can contact your registrar and Perform a Google search. in search box enter “Change Nameserver
.
4) Now Click on Domains. you should get your newly added domain. to create DNS records click on Manage.
5) In the next Screen, click on _ADD _to add a new subdomain.In enter the following values and click Save.
-
Type = CNAME
-
Subdomain = www
-
Destination = ghs.google.com
6) Now click on yourdomain.com(remember there should not be any prefix before it).In the Next screen Click on __Forward to a URL. __we should now create a Web Forward record.
7) Leave the Redirect From field as blank. In Redirect To _Enter http://www.YourDomain.com. Please ensure presence to www. leave rest options at defaults and click on _Save
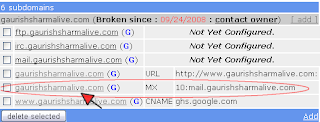
8) Go Back to Domains & Manage(refer to step 4). Now we would change the MX record. click the link on which is has a value MX and 10:mail.yourdomain.com
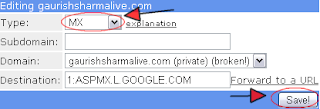
9) In the next screen for change MX record. and click on save
-
Type = MX
-
Subdomain =
-
Destination = 1:ASPMX.L.GOOGLE.COM
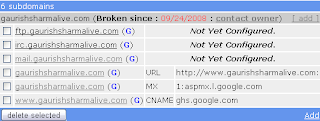
10) We are Done with this part, your current screen should look similar to that of screenshot given below but the Domain name should be different and it should not appear broken as in my case. mine is showing broken
because i am working on a imaginary Domain. for you if everything is fine it should show status as active.
11) (Optional)To check email you have to use http://mail.google.com/a/yourdomain.com. you want a shorter domain like http://mail.yourdomain.com then you have create a CNAME record mail.yourdomain.com pointing to ghs.google.com. Refer to Step 5 for more help
PART-II
Setting Up Email
1) Signup with Google Apps.Choose the Standard Edition. signup it pretty easy to figure out and you can read the inbuilt help in case of facing difficulty. After Sign you would be taken to your dashboard.
2) Verify domain ownership:You in your Dashboard you will be get a Prompt “To activate Google Apps services you must verify that you own your domain - example.com”. Click on Verify Domain Ownership.In Verification method choose create a CNAME record. Find the CNAME settings and enter the following as the CNAME value or alias:
google.com. Refer to PART-I Step 4-5, this time just enter the Verification string in place of www as sub domain.the Verification string would be different for every Domain.
3) Active Email:Now you need to active Email service by clicking on Activate Email > I Have Completed these steps._ _if everything is done correctly you can now proceed to adding more users in Dashboard.
PART-III
Setting Up your Blog
1) Open Blogger Dashboard. if you don’t have a blogspot blog then get one
2) Under manage Blogs, click Settings
3) Navigate to Settings Tab Publishing Tab. Click on Switch to Custom Domain
4) Now Publish your Blog at www.yourdomain.com and click on Save. Also check the Box which says “Redirect gaurishsharma.com to www.gaurishsharma.com” and click on Save.
5) Wait for sometime for DNS changes to be replicated across the Internet Infrastructure. this normally takes upto 24hrs.
Final Thoughts
-
To make setup Process more easier you can Purchase Domain Directly through google. Google Takes $10. payment is done via Google Checkout
-
If you want a Static Website instead of a Blog, then you can use Google Apps’s Sites to Create one.
-
To check your mail you have to login at http://mail.google.com/a/yourdomain.com or http://mail.yourdomain.com (If you created a Short URL)
Enjoy, your new CyberSpace !
Did you enjoy this Post?.Please give your feedback at contact at gaurishsharma.com. Read more at GaurishSharma.com


